Identifying Vehicle Specs and Value with Custom Categorizers
Building Your Own Car Specs and Valuation App
While Imagga’s built-in image tagging system is already extremely powerful, sometimes your business requires something unique to its own use-cases. For that, Imagga provides custom categorizers. To help you understand when you might utilize custom categorizers and how you can implement them, let’s take a look at building a mobile application that lets users easily retrieve the specs and an estimated value of a vehicle just by snapping a few quick photos.
The basic flow of our app is pretty simple. The user will take two photos: front and back. Our custom categorizer will then identify the make and model of the car based on those photos and optionally prompt the user for the year. Once the user confirms the year (or inputs it manually), we’ll reach out to a third-party API to retrieve the specs and value for that specific vehicle.
Important Notes: Car valuation APIs tend to differ by country, and are nearly all locked away behind paid subscriptions, so rather than using a specific actual API here, we’ll rely on a mocked API that’s similar to most of the leading options. Additionally, since this example requires a custom categorizer, the Imagga tagging responses we show below will also be mocked examples.
What are Custom Categorizers
Before we dive into our car specs app itself, let’s take a moment to understand how custom categorizers work. In short, custom categorizers allow you to submit a list of images that are similar to the ones you would use within your own app, along with the categories for each. Imagga then takes those images and “trains” a categorizer based on them, learning from your supplied examples for each category, and creates a custom endpoint for your account that can be used to tag future images.
At this point, you may be asking yourself, "why would I pay for a custom categorizer when I can just use the generic one for free (or far more cheaply)?!" And, truthfully, for many everyday use cases, the tagging by Imagga's standard categorizer is more than capable. That said, there are also many scenarios where you need something far more laser-focused. In our example here, we don't want the image just categorized as "car" or "sedan," but instead narrowed down to "Toyota Corolla" or "BMW Z3."
With that in mind, to begin training our custom categorizer, we start by submitting a list with the models of the cars as our categories (Corolla, Accord, Z3, F-150, etc) along with images of each of those models. Once our custom categorizer has been created and trained, we can then send new images, not included within our original training set, to that endpoint e.g /categories/custom-car-categorizer and Imagga would automatically identify the model. If we wanted Imagga to try to identify the year as well, we would need to include that in our categories (e.g. “Corolla 2005”).
Training Notes: When training a custom categorizer, it's important to make sure that you provide a good collection of images that cover the range of images your user might input. For example, we can't just upload a bunch of images of Corollas and expect the categorizer to correctly identify an Audi. In addition, as you likely know, users rarely take perfectly aligned and cropped photos, so our training photos shouldn't be perfect either. In addition to including a wide range of models, you should also make sure that each model is such from a variety of angles, with different levels of lighting, and, for extra credit, with occasional objects occluding part of the car or part of the vehicle excluded from the frame of the image itself.
Practical Example of Building A Custom Categorizer App
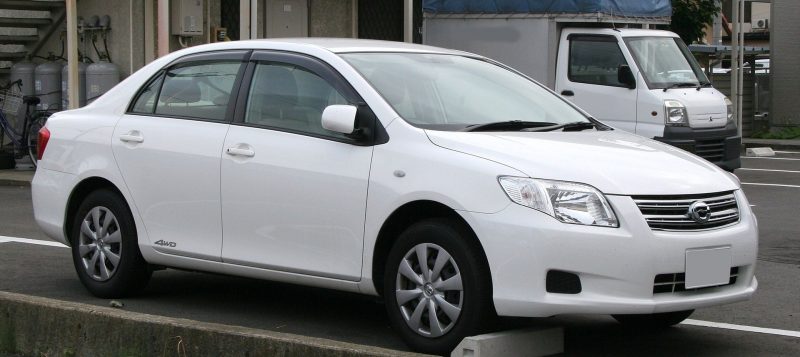
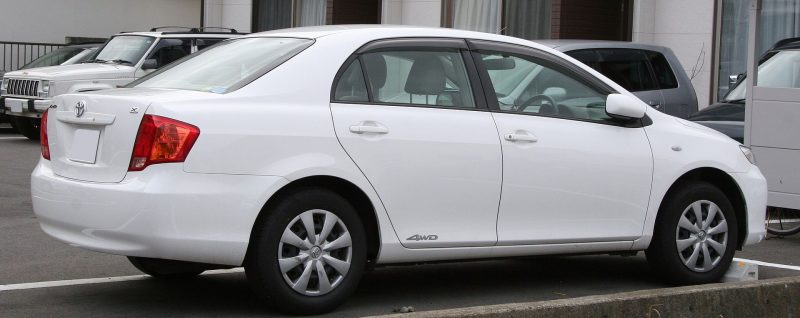
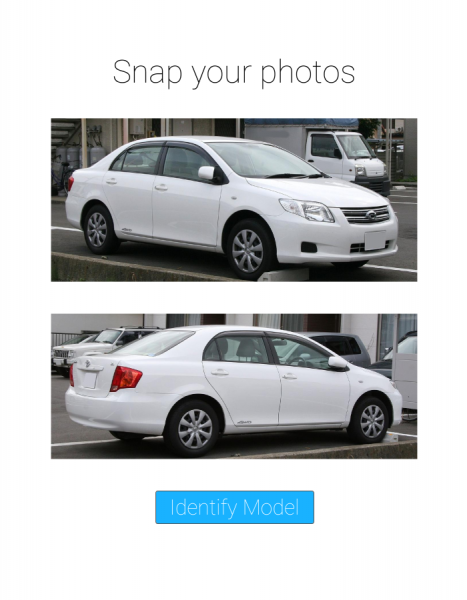
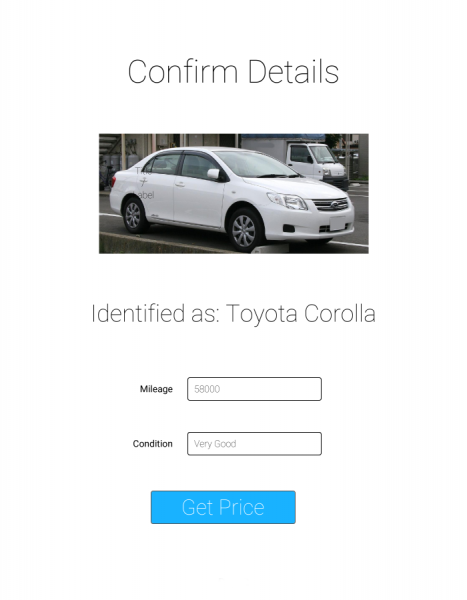
So what does this actually look like? Well, imagine that you want to identify a Toyota Corolla. First you'll take a couple of photos, like the two below:
Then our custom app will upload them to our custom categorizer and get a response that looks something like the following:
{
  "result": {
    "categories": [
      {
        "confidence": 99.9991073608398,
        "name": {
          "en": "toyota corolla"
        }
      }
    ]
  },
  "status": {
    "text": "",
    "type": "success"
  }
}
Depending on how clear the image is, and how well we trained our categorizer, there might be a few other categories returned as well, but, in general, the top option should be a match for the actual model we’re looking for. We also may need to merge the results from the two photos if multiple categories come back for one or both.
Once we have that data, all we need is the year, which we get from the user, and then we can pass that along to our car specs API. As mentioned above, the calls and responses below are just examples, but we’ve listed a few possible APIs in the notes at the end of the article if you want to build this yourself. So let’s take a look at how we might go about this. First, we send a POST request to our car API specs endpoint, https://carspecs.example.com/specs:
{
  "make": "Toyota",
  "model": "Corolla",
  "year": 2010,
  "upgrades": []
}
Which returns a response similar to:
{
  "model_id": "45963",
  "model_name": "Corolla",
  "model_trim": "LE",
  "model_year": "2010",
  "model_body": "Sedan",
  "model_engine_position": "Front",
  "model_engine_cc": "1800",
  "model_engine_cyl": "4",
  "model_engine_fuel": "Gasoline",
  "model_drive": "Front",
  "model_transmission_type": "Automatic",
  "model_seats": "5",
  "model_doors": "4",
  "model_weight_kg": "1245",
  "model_length_mm": "4539",
  "model_width_mm": "1760",
  "model_height_mm": "1466",
  "model_wheelbase_mm": "2601",
  "model_lkm_hwy": "6.9",
  "model_lkm_city": "9.0",
  "model_fuel_cap_l": "50",
  "model_mpg_hwy": "34",
  "model_mpg_city": "26",
  "model_mpg_mixed": null,
  "make_display": "Toyota",
  "make_country": "Japan"
}
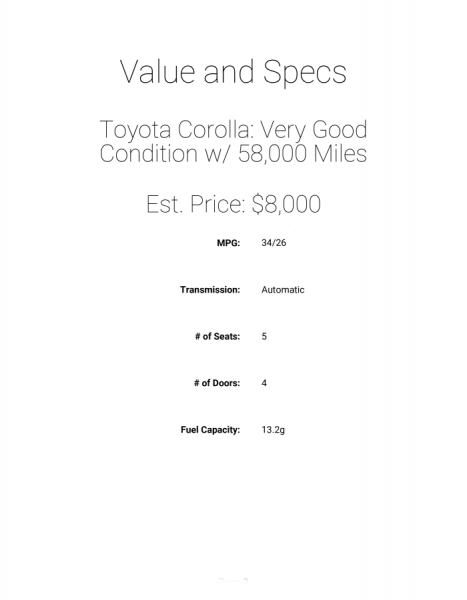
Once we have that model_id, we can pass it along to our valuation API with the mileage and condition of this specific model with a request to https://carspecs.example.com/valuation:
{
  "model_id": "45963",
  "mileage": 58000,
  "condition": "very good"
}
That request gives us the following information (all amounts in USD):
{
  "min": 1795,
  "median": 7995,
  "max": 849995,
  "mean": 8940
}
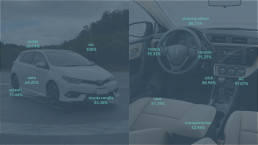
Putting all of this together gives us a clean user experience for snapping a couple photos of a car and retrieving accurate pricing and specs within just a few seconds:
Final Thoughts
Since we utilized mocked APIs and categorizes this time, we don’t have explicit code for you to review or develop yourself, but hopefully this gives you a sense of the power of custom categorizers and how they can be utilized to make interacting with other data sources as simple as the snap of a few photos for your users.
Suggested Resources for Further Development
If you’d like to build upon the ideas we discussed here and actually build out a car spec app or something similar, here are a few good resources to use as you get started:
- Custom Categorizers - More information about how custom categorizers work and how to request one for your business
- CarQuery - Used as the basis for the specs API call
- Important: their data does not include 2018 yet, and it appears they may have stopped updating their database
- MarketCheck - Used as the basis for the market/value information
- Important: They allow up to 300 calls/mo for testing, but further usage requires a paid subscription

Create Autotagging Uploads with NodeJS using Image Recognition API
Applications these days are visual. There’s no denying it. Applications these days are also social. Combine those two and, inevitably, you are going to need to enable your users to upload images and share them, either on their own or as part of larger creations.
With the sharing of images comes the desire to organize and tag them. Tagging images come with a litany of benefits, including:
- Allowing other users to search for specific categories of images
- Automatically labeling images for screen-readers and other accessibility tools
- Easy sorting and organization of images into folders or trees
What we’re building today is a widget that you could easily embed within your own applications. It will take an image selected by the user, upload it to the Imagga servers and tag it, then automatically recommend the top tags for use within your app. The user will still be able to edit and customize the tags for an image, though their selections will be limited to the larger list suggested by Imagga to prevent spamming.
In your own development, you might implement a widget like this as part of a social networking platform, such as a forum or image sharing service. Anytime users are able to upload and categorize their own images, it’s important to both streamline that process for them as well as put restrictions around those categorizations so that they are accurate and not misleading to your other users.
Source code
If you’re merely interested in an overview of how an auto-tagging system like this can be built with Imagga, feel free to skip to the next section. If you’d like to follow along more closely, however, you can download the code from the sidebar to the right and use git tags to match the code with each stage. For example, if the stage is index-and-api-routes, just type in git checkout index-and-api-routes into your terminal to see the code at that stage. If you get stuck or make changes, you can always use get reset HEAD --hard to return to the base code for that stage or git checkout master to return to the completed code.
If you choose to also build and run the code yourself, you will need to get an Imagga API key and secret and add them to a .env file at the root of the code, like so:
API_KEY=MY_KEY_HERE
API_SECRET=MY_SECRET_HERE
You’ll also need to run an npm install within the repo to get the dependencies we need to run the application.
How does the tagging API work
Git tag: index-and-api-routes
Before we get started, we need to understand how to use the Imagga tagging API. The API at https://api.imagga.com/v2/tags takes a GET request with a specified image, and then returns an array of tags, sorted by confidence. For example, if we ask it to analyze this gorgeous mountain vista:

We end up with a list of tags looking like this:
{
    "result": {
        "tags": [
            {
                "confidence": 76.4135513305664,
                "tag": {
                    "en": "mountain"
                }
            },
            {
                "confidence": 69.7975997924805,
                "tag": {
                    "en": "highland"
                }
            },
            {
                "confidence": 54.8374099731445,
                "tag": {
                    "en": "mountains"
                }
            },
            {
                "confidence": 54.5085144042969,
                "tag": {
                    "en": "landscape"
                }
            },
            {
                "confidence": 38.0158271789551,
                "tag": {
                    "en": "sky"
                }
            },
            /* ... More tags here ... */
        ]
    },
    "status": {
        "text": "",
        "type": "success"
    }
}
The tagging API accepts one of two methods for identifying the image you want tagged: image_url and image_upload_id. If we use image_url, we can point the API to any image hosted on a publicly accessible web address and tag it, which is exactly what we did for the mountain image above. This is most helpful if the user is attaching an image already uploaded onto the internet somewhere.
For most applications, though, we want to allow the user to upload their own images, in which case we need to first understand another Imagga API, the uploads endpoint.
Take a look at a simple upload
Git Tag: upload-and-tag
There are two ways to handle tagging uploads with Imagga. In v1 of the API, it was a two-step process, requiring us first to upload the image, than use the returned upload_id to retrieve the tags. With v2, we now recommend you upload and tag the image all in one request, using the POST method to our tagging API. As such, that’s the method we’ll use here, but if you’re still using v1 and want to see an example of how the two-step process might work, check out the git tag upload-and-tag-v1 for an example.
Important note: However you handle uploads, it’s important to know that Imagga does not permanently store the images you upload. For security purposes, they only remain on the Imagga server for 24 hours, so if you’re using the two-step approach you’ll want to ensure you download and store the tags for your uploads within that time period. If you need to have the images removed immediately, you can use the upload_id and a DELETE call to the API as well.
For our sake, however, let’s just take a look at the simplified one-step approach. Our frontend is pretty generic (our demo uses FilePond for simplicity, but any file upload script will work), so let’s focus on the Node.JS backend:
apiRouter.post('/tag', function (req, res) {
  // Get the image field from the POST request
  let image = req.files.image;
  if (!image) {
    res.writeHead(300, {'Content-type': 'text/javascript'})
    res.end(JSON.stringify({'status': 'failed', 'error': 'no image specified'}))
    return
  }

  api
    .tags({
      image: image.data // Pass pure image buffer to API
    })
    .then(
      function (tags) {
        let data = {
          tags: tags
        }
        res.writeHead(200, {'Content-type': 'text/javascript'});
        res.write(JSON.stringify(data));
        res.end();
      },
      function (err) {
        console.warn('Error getting tags', err);
        res.writeHead(500, {'Content-type': 'text/javascript'});
        res.write(JSON.stringify(err));
        res.end();
      }
    );
});
As a reminder, for the full file context, check out the repo and use the tag upload-and-tag.
So let’s walk through the code. First, we have an express router that takes a POST request to /tags with an image file upload. Our middleware (express-fileupload) has made our files easily accessible on the req.files hash, so all we have to do is grab that data and pass it along to our tags handler. For cleanliness, we’ve abstracted the specifics of the HTTP requests to a separate file in api-request.js, but you can see the flow here.
Then, once our request returns with the tags, we simply pass that back on out to the frontend. As we noted above, the response format is exactly the same, so our frontend handler can be exactly the same regardless of whether this is a direct upload or an image url.
Connecting to an auto-tag dropdown
Git tag: preview-and-autotag
Having a raw display of tags is helpful for debugging and development, but it is hardly the kind of user experience we want for our actual applications, so let’s take a look at connecting these tags to something more user-friendly.
For this, we’re going to utilize a tagging library called tagify which turns our text input into a tag field. The flow will be that the user uploads an image, the API passes that on to Imagga and retrieves the tags, and then our widget will allow the user to accept or change the suggested tags. Any tag marked with 60% confidence or higher will be auto-suggested (or the top 3 tags, whichever is greater), and the user will be allowed to add more, but only from the list that Imagga returns. This ensures that while the user can correct or edit the tagging, they cannot add any completely inaccurate tags that might mislead other users on our site.
Our code for the API remains the same as before, so let’s take a look at the frontend code that handles the response:
var tagify
  , imgFile;
var showResults = function (tags) {
  var container = document.getElementById('output')
    , preview = document.getElementById('preview')
    , tagEl = document.getElementById('tags-json')
    , tagInput = document.getElementById('tags')
    , tagList = getTagList(tags);

  // Render the raw JSON response for debugging
  tagEl.innerHTML = JSON.stringify(tags, null, 2);

  if (tagify) {
    // Have already initialized tagify, just update with new tags
    tagify.removeAllTags();
    tagify.settings.whitelist = tagList.all;
  } else {
    // Initialize new tagify and set whitelist
    tagify = new Tagify(
      tagInput,
      {
        whitelist: tagList.all,
        enforceWhitelist: true
      }
    );
  }
  tagify.addTags(tagList.auto);

  if (imgFile) {
    preview.src = URL.createObjectURL(imgFile.file);
  }
  container.classList.remove('hidden')
};

var threshold = 60;
var getTagList = function (tags) {
  var list = {
    auto: [],
    all: []
  }
  for (var i = 0, ii = tags.length; i < ii; i++) {
    var tag = tags[i]
      , t = tag.tag.en;

    // Add first three tags to 'auto-suggest' array, along with any
    // others over confidence threshold
    if (list.auto.length < 3 || tag.confidence > threshold) {
      list.auto.push(t);
    }
    list.all.push(t);
  }
  return list;
}
Let’s walk through this from the top. showResults receives the tags from the Imagga API and immediately outputs the raw results into our pre tag for easy viewing. Again, we obviously wouldn’t include this in a final application, but it can be helpful during development, especially when we want to test our auto-suggest dropdown here shortly.
Along with outputting the raw results, our next task before creating the auto-suggest input is to convert the list from Imagga into something our tagging plugin can understand. For this, we use getTagList. There we loop through all the suggested tags, creating two arrays: an auto array with the first three tags along with any others that are above the confidence threshold (60% in this case) and an all array which we’ll use for the suggestions dropdown.
From there, we simply pass those along to tagify, either updating an existing input (if this isn’t the first image we’ve uploaded) or creating a new one. Finally, for a better user experience, we render the image the user uploaded in the preview element so they can be assured everything was processed correctly.
Go ahead and upload the mountain image we used before (you can download it here), and take a look at how this all comes together. Once it’s uploaded, you should see it previewed on the right, along with three recommended tags: mountain, highland, and landscape.

Now try adding some tags that are included farther down in the suggestions, such as “travel” or “peaceful.” Both of these should auto-complete as you type, just hit tab to add them to the list. Remember though, we want to prevent users from adding tags that are completely inaccurate, so now try typing something not in the list, such as “ocean.” You’ll see that not only is it not part of the suggestion dropdown, if you hit enter to try to add it, it will automatically be removed.
Conclusion
Today we’ve covered how the Imagga tagging and upload APIs work and how you can use them together to implement an auto-tagging widget within your NodeJS projects. Hopefully you can see how quickly and easily you can integrate them to enhance your users’ experiences and streamline your applications. Got a question or a suggestion for what we should build next? Tell us in the comments, we’d love to hear from you!
Libraries used
- Imagga API Documentation – For further reading about the Imagga API
- FilePond – For easy uploading in Javascript
- Tagify – For tagging input
- express-fileupload – For parsing uploads in Node.JS