
Recognizing Objects in House Interior and Recommending Products with Image Recognition
There is a saying that If you want to become an expert of a field, you have to be a master of classification. Photographers can tell if their latest picture was beautiful or not. Musicians can classify what sounds great. Good developers can smell a good code snippet and a bad one.
Categorizations can take many hours of training for humans. Luckily, in the age of machine learning, the machines can help and save a ton of labor time for us. Today, we are going to got our feet wet by creating a photo categorizer app from scratch.
The mobile app we’re building is a demo. You can use it as a foundation for more complex photo organization application or as functionality within another specific application. It will take one image selected by the user, upload to Imagga APIs and categorize it. This is the final result:

Source Code
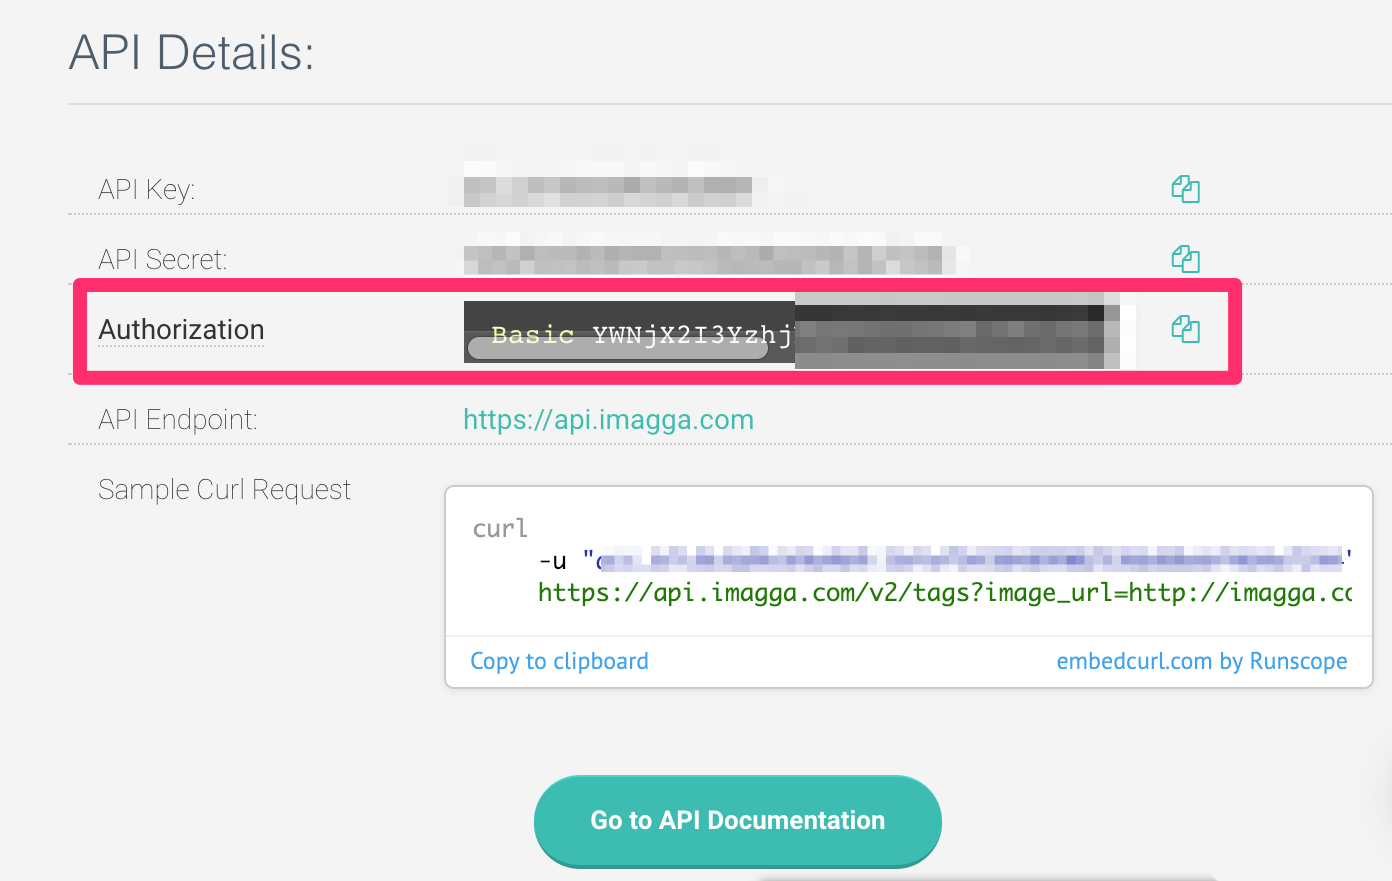
If you are looking into the code directly, feel free to skip reading and download from the side bar on right side. To get the code running, you will need to sign up with an Imagga Hacker Plan (free), get the authorization header and replace ‘YOUR_AUTHORIZATION_HEADER’ in the code. In ViewController.swift, change ‘authorizationHeader’ constant to the value of your own key. The key looks like: “Basic xxxx” as in the red square below:
The Imagga API
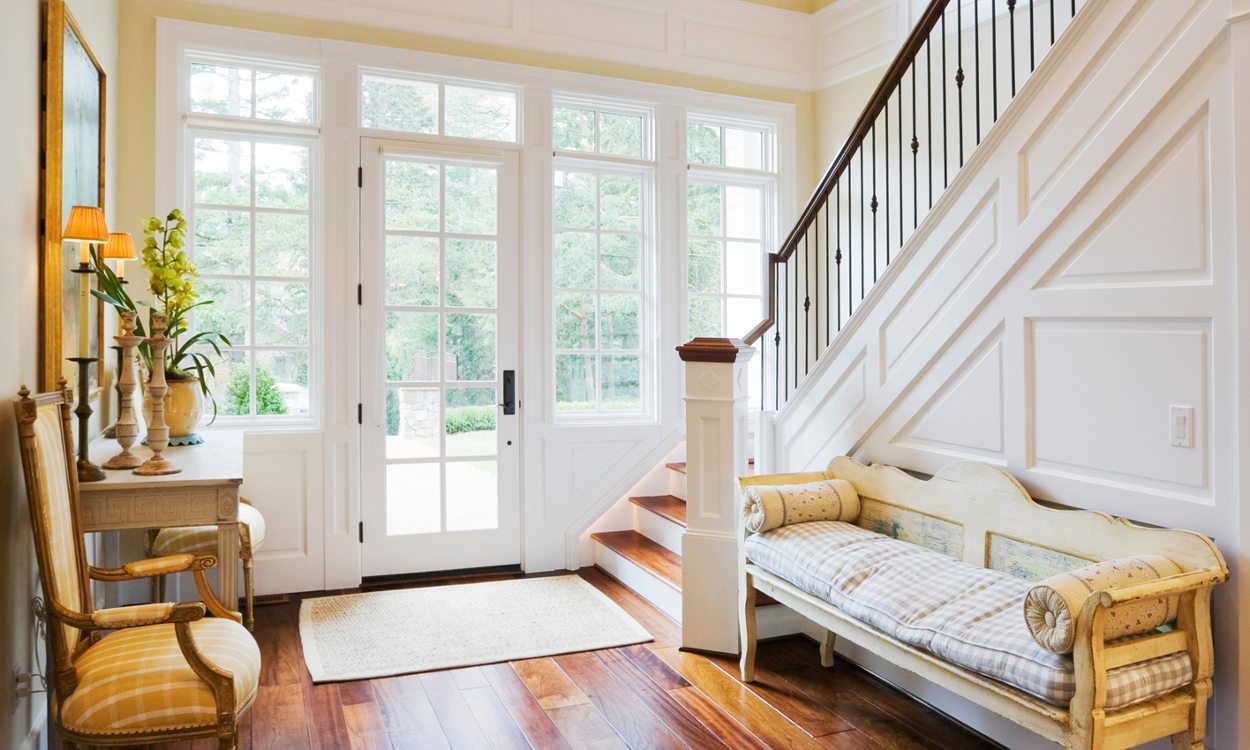
To start, let’s test our Imagga account by using this curl request from command line. This way, we can make sure that our setup is ready for the app. Here is the test image.
'curl --request GET \
--url 'https://api.imagga.com/v2/categories/personal_photos?image_url=https%3A%2F%2Fimagga.com%2Fblog%2Fwp-content%2Fuploads%2F2019%2F01%2Fentrywayheroscaled.jpg' \
--header 'accept: application/json' \
--header 'authorization:YOUR_AUTHORIZATION_HEADER''
After running the code above, we should got the result like this:
{"result":{"categories":[{"confidence":99.9999542236328,"name":{"en":"interior objects"}}]},"status":{"text":"","type":"success"}}
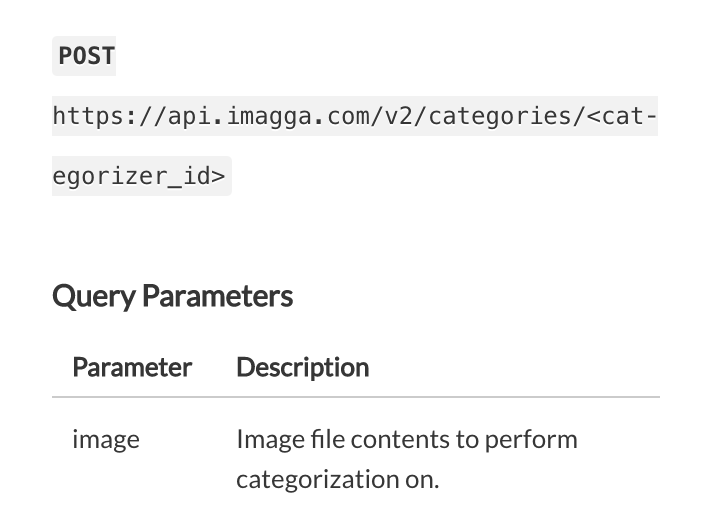
Now, we confirmed that the API key works for us. Notice in the above example, we used an URL of the image file. However, the app we are going to build will use an Image file instead of an image URL. So let’s see what the API doc has to say about that.
Navigate to the developer’s page, API Endpoints section and categories subsection: Imagga REST API Documentation. We can see it asks us to send a post request to this end point, and the parameter is “image” and with image file content. Be sure to keep this in mind because we gonna use it later. It’s time to code!
iOS Project Setup
Create a Xcode project, give it a name ‘Imagga’, select ‘Single View App’ and choose Swift as the language. In order to make the process faster, we are going to use two libraries: ‘Alamofire’ and ‘SwiftyJSON’. Make sure you have a podfile, set the platform to iOS12 and have the pods like this:
# Pods for Imagga
pod 'Alamofire', '~> 4.8'
pod 'SwiftyJSON', '~> 4.0'
We are going to use ‘Alamofire’ for uploading and ’SwiftyJSON’ for parsing the json responses. To manage the libraries, we use cocoapods. Make sure you have installed both pods before moving to the next section.
A Simple Upload in Swift
First thing first: Upload image to our API. Open ‘ViewController.swift’ and add the following below
import SwiftyJSON
import Alamofire
This will let you use the Alamofire module in your code. Next, create a function ‘sendImageToServer(image: UIImage)’ and add the following to it:
func sendImageToServer(image: UIImage) {
    guard let imageData = image.jpegData(compressionQuality: 0.5) else {
        print("no image data find")
        return
    }

    upload(multipartFormData: { (multipartFormData) in
        multipartFormData.append(imageData,
                                 withName: "image",
                                 fileName: "image.jpg",
                                 mimeType: "image/jpeg")
    },
           to: "https://api.imagga.com/v2/categories/personal_photos",
           headers: ["Authorization": authorizationHeader,
                     "accept": "application/json"],
           encodingCompletion: {encodingResult in
            switch encodingResult {
            case .success(let upload, _, _):
                upload.responseJSON { response in
                    debugPrint(response)
                }
            case .failure(let encodingError):
                print(encodingError)
            }})
}
- First, reduced the compress quality of the image to 0.5, so the file size will be smaller when we upload it to server.
- Upload an image named “image.jpg” and with a parameter name ‘image’ —— this is very import. If you recall from the Imagga API section, in order to upload a file, the parameter name we have to use is “image”.
- Send the file to end point: https://api.imagga.com/v2/categories/personal_photos, make sure the authorizationHeader is setup correctly in the headers.
- Print the responses.
In order to test this upload function, let’s grab an image file from the project. You can download it here and add it to your Xcode project. After it’s added, let’s do a test to make sure our upload function works. Add the following into ‘viewDidLoad()’:
override func viewDidLoad() {
    super.viewDidLoad()
    // Do any additional setup after loading the view, typically from a nib.

    guard let image = UIImage(named: "entrywayheroscaled.jpg") else {
        print("no image found")
        return
    }
    sendImageToServer(image: image)
}
and we should see this response from the server
[Result]: SUCCESS: {
    result =     {
        categories =         (
                        {
                confidence = "99.9999542236328";
                name =                 {
                    en = "interior objects";
                };
            }
        );
    };
    status =     {
        text = "";
        type = success;
    };
}
In Raywenderlich.com, there’s a more detailed tutorial of how to use Alamofire, SwiftyJSON with Imagga API here: https://www.raywenderlich.com/35-alamofire-tutorial-getting-started. Since we’re more focused on using the API, I’ll leave the Swift side—digging to you:)
Handle Return Value
The next step after we have printed the response is to handle it and save it to our data module. Add the following function to ViewController.swift
func handleResponse(response: DataResponse<Any>) {
    guard response.result.isSuccess,
        let value = response.result.value else {
            print("Error while uploading file: \(String(describing: response.result.error))")
            return
    }

    self.personalPhotos = (JSON(value)["result"]["categories"].array?.map { json in
        PersonalPhoto(name: json["name"]["en"].stringValue,
                      confidence: json["confidence"].doubleValue)
        })!

}
and in ‘sendImageToServer(image: UIImage)’ function, add
self.handleResponse(response: response)
after ‘debugPrint(response)’.
Inside the ViewController class, add
var personalPhotos: [PersonalPhoto] = []
before ‘viewDidLoad()’ function.
Here’s a step-by-step explanation of the code above:
- Check that the response was successful. If not, print the error.
- Use ‘SwiftyJSON’ to retrieve the ‘categories’ array from the response. It iterates through each of the categories and transforms it to a PersonalPhoto struct.
- Save the array into ‘self.personalPhotos’.
- Put it inside a call back block after sending the image.
- Add a variable in ViewController to save the categories.
We don’t have a PersonalPhoto struct yet, so let’s create one. Create a new file named: PersonalPhoto.swift. Add the following to it:
struct PersonalPhoto {
    var name: String
    var confidence: Double
}
Run the project, and set a breakpoint right after we assigned value to self.personalPhotos. We should see one PersonalPhoto object in the array.
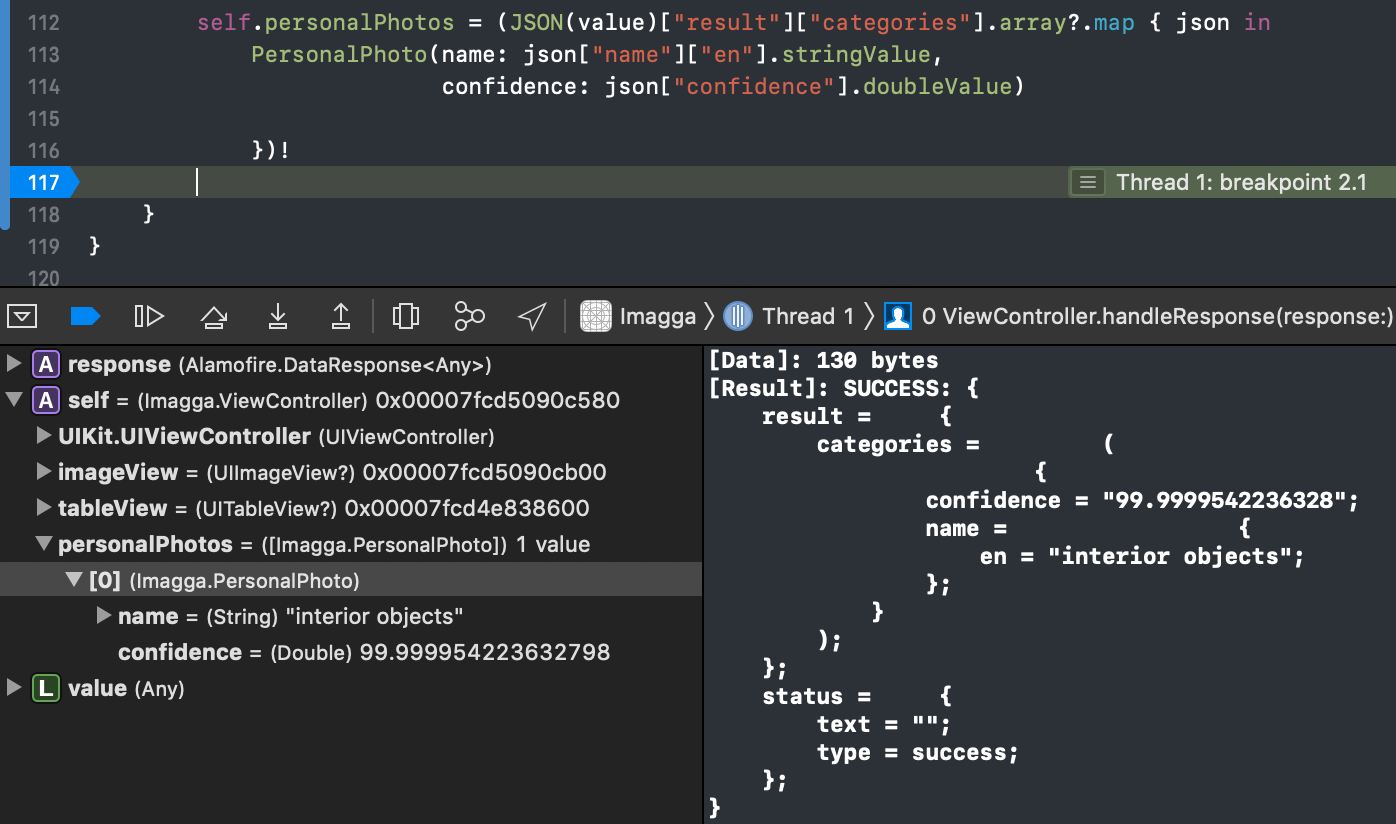
That means we are good for upload image and parse the responses. Now it is time to show the results in UI.
Connect UI in Xcode
Let’s see our app UI in the Main.storyboard file.
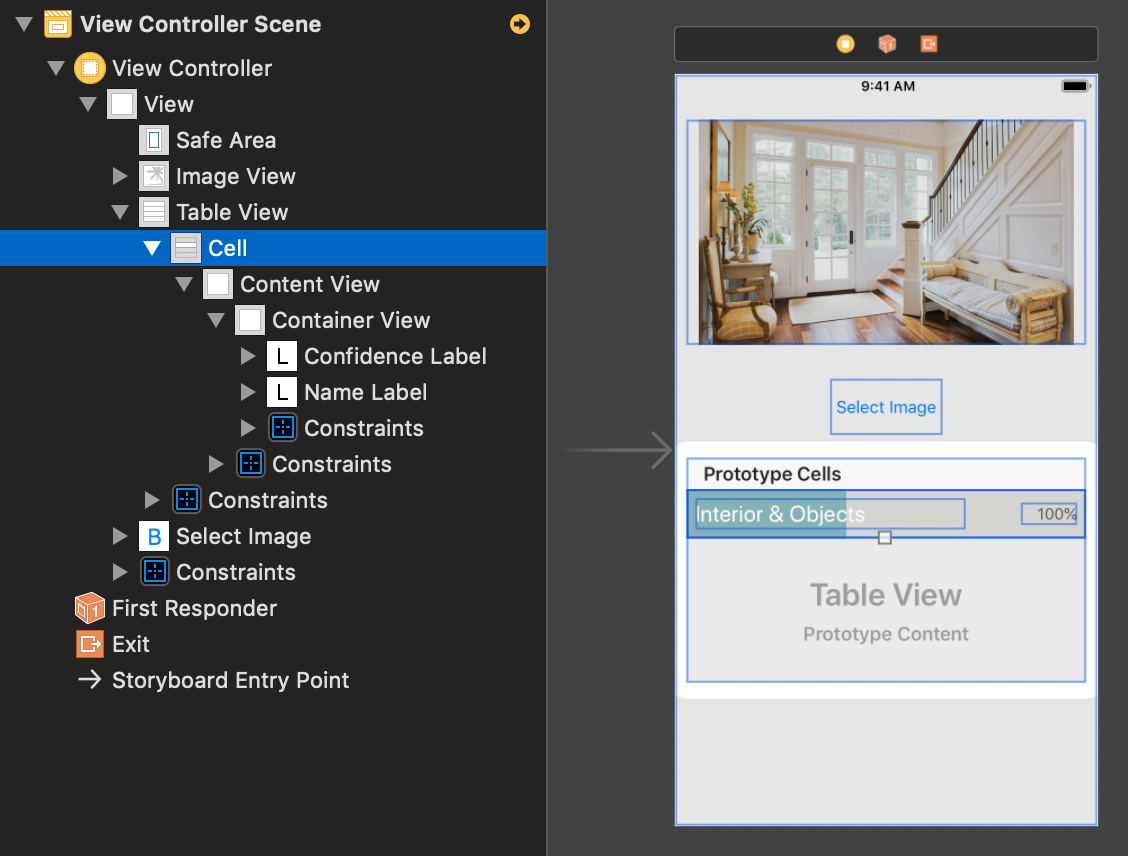
There are three main items: 1. Image view, 2 Table view 3. Select button.
Here are my constrains:
- Image view: Height 200, leading & trailing space 10, top space 20, horizontal center. Default image: ‘entrywayheroscaled.jpg’, set contentMode to ‘Aspect Fit’
- Select button: Height 50, Width 100, horizontal center, top to Image View 20
- Table view: Height 200, leading & trailing space 10, top to Select button 20
Drag a prototype UITableViewCell into the tableview, and give it a container view, a confidence label on the left and a name label on the right. Tweak the label size, color and position as you would like. Make sure you connect the IBOutlets into ViewController.
@IBOutlet weak var imageView: UIImageView!
@IBOutlet weak var tableView: UITableView!
Now our UI is good to go.
Select Photo from User Library
Since we are going to select the photo from user’s photo library, we connect ‘Select Button’ IBAction event into a buttonPressed function:
@IBAction func buttonPressed(_ sender: Any) {
    openPhotoLibraray()
}
and call ‘openPhotoLibraray()’ function inside it.
In order to open the system photo library, add ‘UIImagePickerControllerDelegate’ and ‘UINavigationControllerDelegate’ to the ViewController class.
class ViewController: UIViewController, UIImagePickerControllerDelegate, UINavigationControllerDelegate, UITableViewDataSource {The calling system photo library part is straight forward:
func openPhotoLibraray() {
    if UIImagePickerController.isSourceTypeAvailable(.photoLibrary) {
        let picker = UIImagePickerController()
        picker.delegate = self as UIImagePickerControllerDelegate & UINavigationControllerDelegate
        picker.sourceType = .photoLibrary
        self.present(picker, animated: true) {

        }
    }
}

func imagePickerController(_ picker: UIImagePickerController, didFinishPickingMediaWithInfo info: [UIImagePickerController.InfoKey : Any]) {
    picker.dismiss(animated: true)

    guard let image = info[.originalImage] as? UIImage else {
        print("No image found")
        return
    }

    imageView.image = image
}
Now if you build and run the project, “Select Photo” button will give you the build-in photo library and you can choose a photo. The Image View will display the photo you selected.
Connect Two Parts Together
We now have two parts:
- Upload an image to server and handle the responses.
- Select an image from the user photos library.
Let’s remove all the testing code inside ‘viewDidLoad()’, and in the last line of
func imagePickerController(_ picker: UIImagePickerController, didFinishPickingMediaWithInfo info: [UIImagePickerController.InfoKey : Any])
add ‘sendImageToServer(image: image)’ right after ‘imageView.image = image’. Build and run the project, select a photo from your library, and you should see the responses in the logs.
UI Tweaks
It is time to display the responses in UI. We are going to show the result like below:
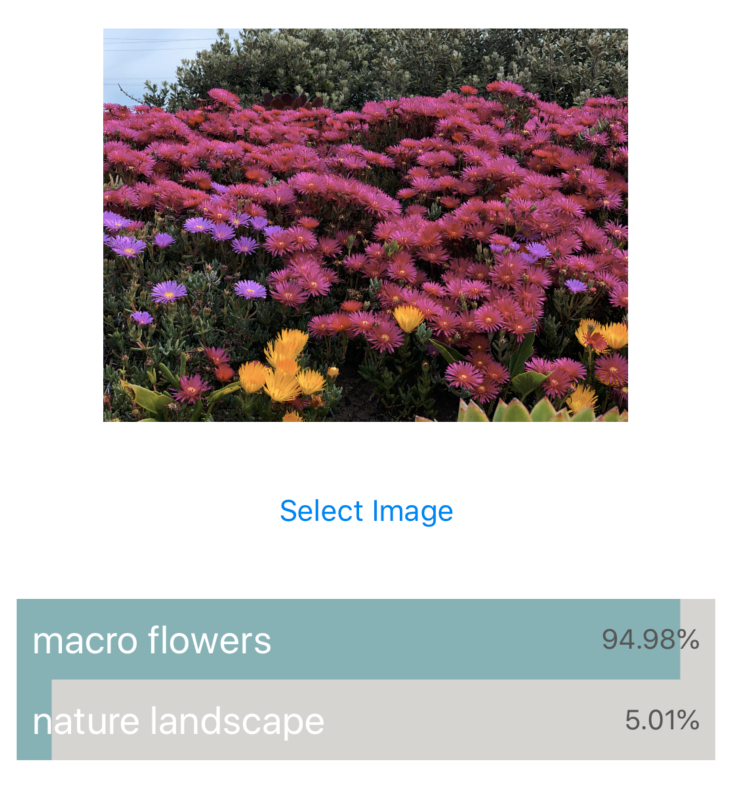
It is a tableview with multiple cells. In each cell, we display the categorizer’s name, confidence and the color indicator in the background.
To get the tableViewCell to work, create a subclass of UITableViewCell and name it ‘PersonalPhotoCell’ and connect all three IBOutlets
class PersonalPhotoCell: UITableViewCell {
    @IBOutlet weak var nameLabel: UILabel!
    @IBOutlet weak var confidenceLabel: UILabel!
    @IBOutlet weak var containerView: ConfidenceView!
and ConfidenceView.swift as follow:
import UIKit
@IBDesignable
class ConfidenceView: UIView {
    @IBInspectable var confidence: Double = 0 {
        didSet {
            setNeedsDisplay()
        }
    }

    override func draw(_ rect: CGRect) {
        // Drawing code
        let color = UIColor.init(red: 123.0/255.0, green: 184.0/255.0, blue: 183.0/255.0, alpha: 1.0)

        let rectToDraw = CGRect(x: 0, y: 0, width: CGFloat(rect.size.width) * CGFloat(confidence), height: rect.size.height)
        let path : UIBezierPath = UIBezierPath(rect: rectToDraw)
        color.set()
        path.fill()
    }
}
The ConfidenceView.swift is a subclass of UIView, and we use it as a container. The view only draw the percentage of confidence with color. This way it gives a good visual impression of the confidence level. In the tableView delegate:
func tableView(_ tableView: UITableView, numberOfRowsInSection section: Int) -> Int {
    return personalPhotos.count
}

func tableView(_ tableView: UITableView, cellForRowAt indexPath: IndexPath) -> UITableViewCell {
    let cell = tableView.dequeueReusableCell(withIdentifier: "Cell", for: indexPath) as! PersonalPhotoCell
    let personalPhoto = personalPhotos[indexPath.row] as PersonalPhoto
    cell.nameLabel.text = personalPhoto.name
    cell.confidenceLabel.text = String(format: "%.2f%%", personalPhoto.confidence)
    cell.containerView.confidence = personalPhoto.confidence / 100.0
    return cell
}
We use our variable personalPhotos as the data source and set it accordingly to display in the cell. Notice those two lines:
cell.confidenceLabel.text = String(format: "%.2f%%", personalPhoto.confidence)
cell.containerView.confidence = personalPhoto.confidence / 100.0
We want to format it with two decimal points and also control the confidence value between 0 ~ 1 for the confidenceView.
Now if you run the project and select a photo, nothing is going to happen. But why?
This is because we haven’t updated our tableview after receiving the responses, so let’s do that now. In the upload image function, add
self.tableView.reloadData()
right after ‘self.handleResponse(response: response)’, this way we’re going to have an updated tableview once handled all the responses.
Run the project, select a photo you like and the server gonna return a categorizer it fits. And now, we’re good!
Best API Practice
Before we wrap up our tutorial, I want to emphasize on the best practices of the API: Imagga REST API DocumentationFor the image size:
The API doesn't need more that 300px on the shortest side to provide you with the same great resultsAnd for a good confidence level:
Our suggestion is setting the confidence threshold at 15-20%.So with those two points in mind, if you want to make the upload faster while keep the same quality, crop the image’s shortest side to 300px. Also, by filtering out all the categories with a confidence less than 80%, you will get a more accurate result.
Conclusion
Today we’ve gone through how to use the categorization API and create the iOS app from scratch by using Swift. Hope you enjoy the reading and had fun . Feel free to leave any questions and keep me updated on what you going to build next. Cheers!
References
Categorization API for Image Classification | Imagga Solutions
Alamofire Tutorial: Getting Started | raywenderlich.com
Create Autotagging Uploads with NodeJS using Image Recognition API – Imagga Blog
How to Make an Image Classifier – Intro to Deep Learning #6 – YouTube