In web and mobile applications, as well as any other digital media, the use of images as part of their content is very common. With images being so ubiquitous, there comes a need to ensure that the images posted are appropriate to the medium they are on. This is especially true for any medium accepting user-generated content. Even with set rules for what can and cannot be posted, you can never trust users to adhere to the set conditions. Whenever you have a website or medium accepting user-generated content, you will find that there is a need to moderate the content.
Why Moderate Content?
There are various reasons why content moderation might be in your best interest as the owner/maintainer of a digital medium. Some common ones are:
- Legal obligations – If your application accommodates underaged users, then you are obligated to protect them from adult content.
- Brand protection – How your brand is perceived by users is important, so you might want to block some content that may negatively affect your image.
- Protect your users – You might want to protect your users against harassment from other users. The harassment can be in the form of users attacking others by posting offensive content. An example of this is Facebook’s recent techniques of combating revenge p0rn on their platform.
- Financial – It might be in your best interest financially, to moderate the content shown on your applications. For instance, if your content is somewhat problematic, other businesses might not want to associate with you in terms of advertising on your platform or accepting you as an affiliate for them. For some Ad networks, keeping your content clean is a rule that you have to comply with if you want to use them. Google Adsense is an example of this. They strictly forbid users of the service from placing their ads on pages with adult content.
- Platform rules – You might be forced to implement some form of content moderation if the platform your application is on requires it. For instance,Apple requires applications to have a way of moderating and restricting user-generated content before they can be placed on the App Store and Google also restricts apps that contain sexually explicit content
As you can see, if your application accepts user-generated content, moderation might be a requirement that you can’t ignore. There are different ways moderation can be carried out:
- Individual driven – an example of this is a website that has admins that moderate the content. The website might work by either restricting the display of any uploaded content until it has been approved by an admin or it might allow immediate display of uploaded content, but have admins who constantly check posted content. This method tends to be very accurate in identifying inappropriate content, as the admins will most likely be clear as to what is appropriate/inappropriate for the medium. The obvious problem with this is the human labor needed. Hiring moderators might get costly especially as the application’s usage grows. Relying on human moderators can also affect the app’s user experience. The human response will always be slower than an automated one. Even if you have people working on moderation at all times, there will still be a delay in identifying and removing problematic content. By the time it is removed, a lot of users could have seen it. On systems that restrict showing uploaded content until it has been approved by an admin, this delay can become annoying to users.
- Community driven – with this type of moderation, the owner of the application puts in place features that enable the app’s users to report any inappropriate content e.g. flagging the content. After a user flags a post, an admin will then be notified. This also suffers from a delay in identifying inappropriate content from both the community (who might not act immediately the content is posted) and the administrators (who might be slow to respond to flagged content). Leaving moderation up to the community might also result in reported false positives as content that is safe is seen by some users as inappropriate. With a large community, you will always have differing opinions, and because many people will probably not have read the Terms and Conditions of the medium, they will not have clear-cut rules of what is and isn’t okay.
- Automated – with this, a computer system usually using some machine learning algorithm is used to classify and identify problematic content. It can then act by removing the content or flagging it and notifying an admin. With this, there is a decreased need for human labor, but the downside is that it might be less accurate than a human moderator.
- A mix of some or all the above methods – Each of the methods described above comes with a shortcoming. The best outcome might be achieved by combining some or all of them e.g. you might have in place an automated system that flags suspicious content while at the same time enabling the community to also flag content. An admin can then come in to determine what to do with the content.
A Look at the Imagga NSFW Categorization API
Imagga makes available the NSFW (not safe for work) Categorization API that you can use to build a system that can detect adult content. The API works by categorizing images into three categories:
- nsfw – these are images considered not safe. Chances are high that they contain ponographic content and/or display nude bodies or inappropriate body parts.
- underwear – this categorizes medium safe images. These might be images displaying lingerie, underwear, swimwear, e.t.c.
- safe – these are completely safe images with no nudity.
The API works by giving a confidence level of a submitted image. The confidence is a percentage that indicates the probability of an image belonging to a certain category.
To see the NSFW API in action, we’ll create two simple programs that will process some images using the API. The first program will demonstrate how to categorize a single image while the second will batch process several images.
Setting up the Environment
Before writing any code, we’ll first set up a virtual environment. This isn’t necessary but is recommended as it prevents package clutter and version conflicts in your system’s global Python interpreter.
First, create a directory where you’ll put your code files.
$ mkdir nsfw_test
Then navigate to that directory with your Terminal application.
$ cd nsfw_test
Create the virtual environment by running:
$ python3 -m venv venv
We’ll use Python 3 in our code. In the above, we create a virtual environment with Python 3. With this, the default Python version inside the virtual environment will be version 3.
Activate the environment with (on MacOS and Linux):
$ source venv/bin/activate
On Windows:
$ venv\Scripts\activate
Categorizing Images
To classify an image with the NSFW API, you can either send a GET request with the image URL to the /categories/<categorizer_id> endpoint or you can upload the image to /uploads, get back a upload_id value which you will then use in the call to the /categories/<categorizer_id>/ endpoint. We’ll create two applications that demonstrate these two scenarios.
Processing a Single Image
The first app we’ll create is a simple web application that can be used to check if an image is safe or not. We’ll create the app with Flask.
To start off, install the following dependencies.
$ pip install flask flask-bootstrap requests
Then create a folder named templates and inside that folder, create a file named index.html and add the following code to it.
{% extends "bootstrap/base.html" %}

{% block title %}Imagga NSFW API Test{% endblock %}

{% block navbar %}

<nav class="navbar navbar-inverse" role="navigation">
<div class="container"><a class="navbar-brand" href="{{ url_for('index') }}">NSFW API Test</a></div>
</nav>{% endblock %}

{% block content %}
<div class="container">
    <div class="row">
        <div class="col-md-8">
            <form action="" method="POST">

                <div class="form-group">
                    <label for="image_url">Image URL</label>
                    <input type="url" id="image_url" name="image_url"/>
                    <button class="btn btn-primary" type="submit">Submit</button>
                </div>

            </form>
        </div>
    </div>
    {% if image_url %}
    <div class="row">
        <div class="col-md-4"><img class="img-thumbnail" src="{{ image_url }}" /></div>
        <div class="col-md-4">{{ res }}</div>
    </div>
    {% endif %}

</div>
{% endblock %}
In the above code, we create an HTML template containing a form that the user can use to submit an image URL to the Imagga API. When the response comes back from the server, it will be shown next to the processed image.
Next, create a file named app.py in the root directory of your project and add the following code to it. Be sure to replace INSERT_API_KEY and INSERT_API_SECRET with your Imagga API Key and Secret. You can signup for a free account to get these credentials. After creating an account, you’ll find these values on your dashboard:
from flask import Flask, render_template, request
from flask_bootstrap import Bootstrap
import requests
from requests.auth import HTTPBasicAuth


app = Flask(__name__)
Bootstrap(app)

# API Credentials. Set your API Key and Secret here
API_KEY = 'acc_xxxxxxxxxxxxxxx'
API_SECRET = 'xxxxxxxxxxxxxxxxxxxxxxxxxxxxxxxx'
ENDPOINT = 'https://api.imagga.com/v2/categories/nsfw_beta'
auth = HTTPBasicAuth(API_KEY, API_SECRET)


@app.route('/', methods=['GET', 'POST'])
def index():
    image_url = None
    res = None

    if request.method == 'POST' and 'image_url' in request.form:
        image_url = request.form['image_url']
        response = requests.get(
           '%s?image_url=%s' % (ENDPOINT, image_url),
           auth=auth)

        try:
            res = response.json()
        except Exception as e:
            print('Exception in JSON decode:')
            print(e)
            print(response.content, response.status_code)

    return render_template('index.html', image_url=image_url, res=res)


if __name__ == '__main__':
    app.run(debug=True)
Every call to the Imagga API must be authenticated. Currently, the only supported method for authentication is Basic. With Basic Auth, credentials are transmitted as user ID/password pairs, encoded using base64. In the above code, we achieve this with a call to HTTPBasicAuth().
We then create a function that will be triggered by GET and POST requests to the / route. If the request is a POST, we get the data submitted by form and send it to the Imagga API for classification.
The NSFW Categorizer is one of a few categorizers made available by the Imagga API. A Categorizer is used to recognize various objects and concepts. There are a couple predefined ones available (Personal Photos and NSFW Beta) but if none of them fit your needs we can build a custom one for you.
As mentioned previously, to send an image for classification, you send a GET request to the /categories/<categorizer_id> endpoint. The categorizer_id for the NSFW API is nsfw_beta. You can send the following parameters with the request:
- image_url: URL of an image to submit for categorization.
- image_upload_id: You can also directly send image files for categorization by uploading the images to our
/uploadsendpoint and then provide the received content identifiers via this parameter. - language: If you’d like to get a translation of the tags in other languages, you should use the language parameter. Its value should be the code of the language you’d like to receive tags in. You can apply this parameter multiple times to request tags translated in several languages. See all available languages here.
After processing the request, the API sends back a JSON object holding the image’s categorization data in case of a successful processing, and an error message incase there was a problem processing the image.
Below you can see the response of a successful categorization:
{
  "result": {
    "categories": [
      {
        "confidence": 99.1496658325195,
        "name": {
          "en": "safe"
        }
      }
    ]
  },
  "status": {
    "text": "",
    "type": "success"
  }
}
Note that you might not always get JSON with the three categories displayed. If the confidence of a category is 0, this category will not be included in the JSON object.
Below you can see the response of a failed categorization.
{
  "status": {
    "text": "Unexpected error while running the classification job.",
    "type": "error"
  }
}
Back to our app, you can save your code and run it with:
$ python app.py
If you navigate to http://127.0.0.1:5000/ you should see a form with one input field. Paste in the URL of an image and submit it. The image will be processed and you will get back a page displaying the image and the JSON returned from the server. To keep it simple, we just display the raw JSON, but in a more sophisticated app, it would be parsed and used to make some decision.
Below, you can see the results of some images we tested the API with.
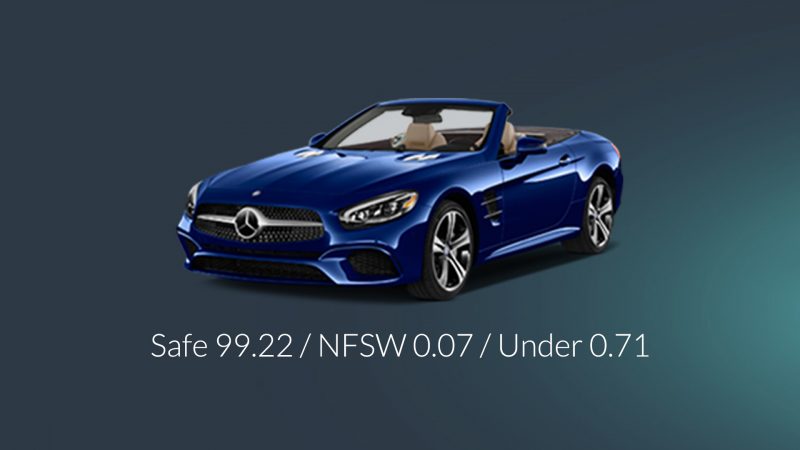
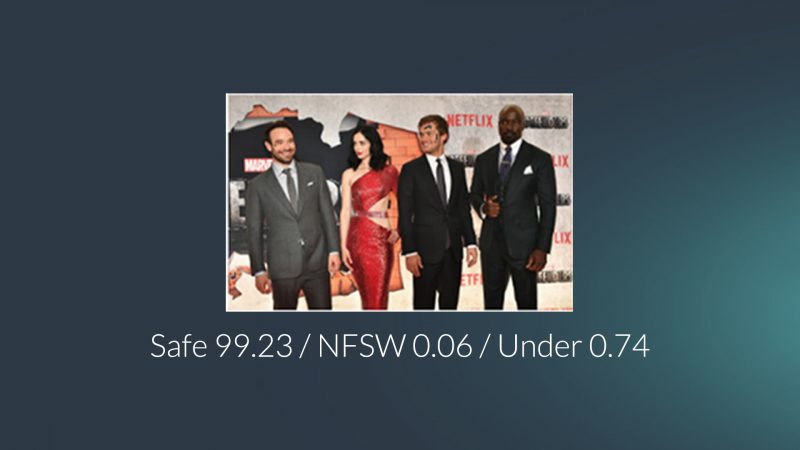
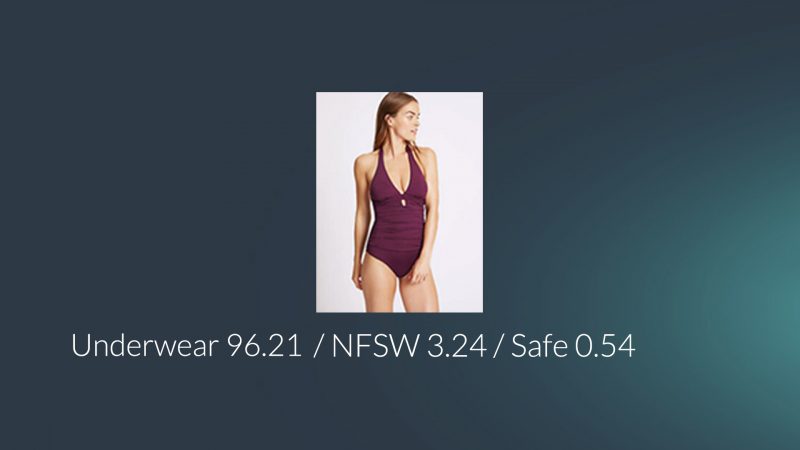
As you can see, the images have been categorized quite accurately. The first two have safe confidence scores of 99.22 and 99.23 respectively while the last one has an underwear score of 96.21. Of course, we can’t show an nsfw image here on this blog, but you are free to test that on your own.
To know the exact confidence score to use for your app, you should first test the API with several images. When you look at the results of several images, you will be able to better judge which number to look out for in your code when filtering okay and not okay images. If you are still not sure about this, our suggestion is setting the confidence threshold at 15-20%. However, if you’d like to be more strict on the accuracy of the results, setting the confidence threshold at 30% might do the trick.
You should know that the technology is far from perfect and that the NSFW API is still in beta. From time to time, you might get an incorrect classification.
Note that the API has a limit of 5 seconds for downloading the image. If the limit is exceeded with the URL you send, the analysis will be unsuccessful. If you find that most of your requests are unsuccessful due to timeout error, we suggest uploading the images to our /uploads endpoint first (which is free and not accounted towards your usage) and then use the content id returned to submit the images for processing via the content parameter. We’ll see this in action in the next section.
Batch Processing Several Images
The last app we created allowed the user to process one image at a time. In this section, we are going to create a program that can batch process several images. This won’t be a web app, it will be a simple script that you can run from the command line.
Create a file named upload.py and add the code below to it. If you are still using the virtual environment created earlier, then the needed dependencies have already been installed, otherwise, install them with pip install requests.
import os
import json
import argparse
import requests
from requests.auth import HTTPBasicAuth

# API Credentials. Set your API Key and Secret here
API_KEY = 'acc_xxxxxxxxxxxxxxx'
API_SECRET = 'xxxxxxxxxxxxxxxxxxxxxxxxxxxxxxxx'

API_ENDPOINT = 'https://api.imagga.com/v2'
FILE_TYPES = ['.png', '.jpg', '.jpeg', '.gif']


class ArgumentException(Exception):
    pass


if API_KEY == 'YOUR_API_KEY' or \
   API_SECRET == 'YOUR_API_SECRET':
    raise ArgumentException('You haven\'t set your API credentials. '
                            'Edit the script and set them.')

auth = HTTPBasicAuth(API_KEY, API_SECRET)


def upload_image(image_path):
    if not os.path.isfile(image_path):
        raise ArgumentException('Invalid image path')

    # Open the desired file
    with open(image_path, 'rb') as image_file:
        # Upload the image with a POST
        # request to the /uploads endpoint
        uploads_response = requests.post(
            '%s/uploads' % API_ENDPOINT,
            auth=auth,
            files={'image': image_file})

    # Example /uploads response:
    # {
    #   "result": {
    #     "upload_id": "i05e132196706b94b1d85efb5f3SaM1j"
    #   },
    #   "status": {
    #     "text": "",
    #     "type": "success"
    #   }
    # }
    try:
        upload_id = uploads_response.json()['result']['upload_id']
    except Exception as e:
        print('Error when reading upload response: ', e.text)

    return upload_id


def check_image(upload_id):
    # Using the uploads id, make a GET request to the /categorizations/nsfw
    # endpoint to check if the image is safe
    params = {
       'image_upload_id': upload_id
    }
    response = requests.get(
        '%s/categories/nsfw_beta' % API_ENDPOINT,
        auth=auth,
        params=params)
    return response.json()


def main():
    parser = argparse.ArgumentParser(description='Tags images in a folder')
    parser.add_argument(
        'input', help='The input - a folder containing images')
    parser.add_argument(
        'output', help='The output - a folder to output the results')
    args = parser.parse_args()

    tag_input = args.input
    tag_output = args.output
    results = {}

    if not os.path.exists(tag_output):
        os.makedirs(tag_output)

    if not os.path.isdir(tag_input):
        raise ArgumentException(
            'The input directory does not exist: %s' % tag_input)

    images = []
    for img in os.scandir(tag_input):
        if not os.path.isfile(img.path):
            print('Bad file path', img.path)
            continue

        name, extension = os.path.splitext(img.name)

        if extension.lower() not in FILE_TYPES:
            print('Extension %s not in allowed' % extension, FILE_TYPES)
            continue

        images.append(img.path)

    images_count = len(images)

    for i, image_path in enumerate(images):
        print('[%s / %s] %s uploading' %
              (i + 1, images_count, image_path))

        upload_id = upload_image(image_path)
        nsfw_result = check_image(upload_id)
        results[image_path] = nsfw_result

        print('[%s / %s] %s checked' % (
            i + 1, images_count, image_path))

    for image_path, result in results.items():
        image_name = os.path.basename(image_path)
        result_path = os.path.join(tag_output, 'result_%s.json' % image_name)

        with open(result_path, 'w') as results_file:
            json.dump(result, results_file, indent=4)

    print('Done. Check your output folder for the results')


if __name__ == '__main__':
    main()
We use the argparse module to parse arguments from the command line. The first argument passed in will be the path to a folder containing images to be processed while the second argument is a path to a folder where the results will be saved.
For each image in the input folder, the script uploads it with a POST request to the /uploads endpoint. After getting a content id back, it makes another call to the /categories/<categorizer_id> endpoint. It then writes the response of that request to a file in the output folder.
Note that all uploaded files sent to /uploads remain available for 24 hours. After this period, they are automatically deleted. If you need the file, you have to upload it again. You can also manually delete an image by making a DELETE request to https://api.imagga.com/v2/uploads/<upload_id>.
Add some images to a folder and test the script with:
$ python upload.py path/to/input/folder path/to/output/folder
If you look at the output folder you selected, you should see a JSON file for each processed image.
Feel free to test out the Imagga NSFW Categorization API. If you have any suggestions on ways to improve it or just general comments on the API, you can post them in the Comment Section below or get in touch with us directly. We are always happy to get feedback on our products.